ListView 高效数据列表 >=v1.0.0
最基本的使用方式就是创建一个ListView.DataSource数据源,然后给它传递一个普通的数据数组,再使用数据源来实例化一个ListView组件,并且定义它的renderRow回调函数,这个函数会接受数组中的每个数据作为参数,返回一个可渲染的组件(作为listview的每一行)。
注:该版本暂时不支持scrollTo。
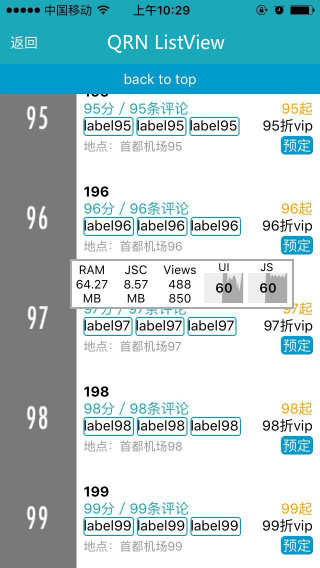
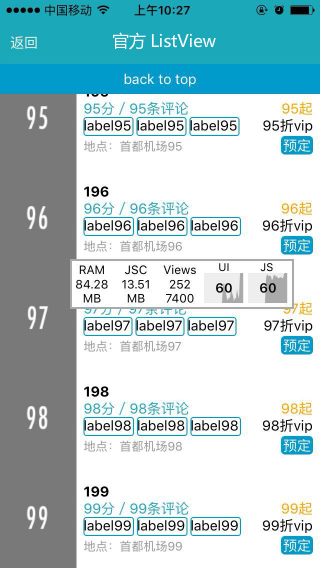
与官方ListView性能对比(官方已开启removeClippedSubviews)
图文列表200行 iPhone5C IOS9.3.2
| 使用组件 | 渲染前内存 | 渲染后内存 | 平均帧数 |
|---|---|---|---|
| QRN ListView | 50.21MB | 64.27MB | 30~50fps |
| 官方 ListView | 51.33MB | 84.28MB | 10~30fps |
图文列表500行 iPhone5C IOS9.3.2
| 使用组件 | 渲染前内存 | 渲染后内存 | 平均帧数 |
|---|---|---|---|
| QRN ListView | 50.39MB | 67.86MB | 20~40fps |
| 官方 ListView | 50.18MB | 133.40MB | 5~20fps |


使用说明
基本用法
最基本的使用方式就是通过 ListView.DataSource 类来创建一个数据源,然后给它传递一个普通的数据数组,再使用数据源来实例化一个 ListView 组件,并且定义它的 renderRow 回调函数,这个函数会接受数组中的每个数据作为参数,返回一个可渲染的组件(作为listview的每一行)。
constructor(props) {
    super(props);
    var ds = new ListView.DataSource({rowHasChanged: (r1, r2) => r1 !== r2});
    this.state = {
        dataSource: ds.cloneWithRows(['row 1', 'row 2']),
    };
}
render() {
    return (
        <ListView
            dataSource={this.state.dataSource}
            renderRow={(rowData) => <Text>{rowData}</Text>}
        />
    );
}
数据源
组件最基础的属性是 dataSource,通过它可以配置列表的数据源。而 ListView.DataSource 为 ListView 组件提供高性能的数据处理和访问。
我们需要调用方法从原始输入数据中抽取数据来创建ListViewDataSource对象,并用其进行数据变更的比较。原始输入数据可以是简单的字符串数组,
也可以是复杂嵌套的对象——分不同区(section)各自包含若干行(row)数据。更多使用方式请参考ReactNative官网。
constructor(props) {
    super(props);
    this.ds = new ListView.DataSource({
        rowHasChanged: (r1, r2) => r1 !== r2,
        sectionHeaderHasChanged: (s1, s2) => s1 !== s2
    })
    let sections = {
        part1: [],
        part2: []
    }
    for(let i = 0; i < 20; i++) {
        if(i < 10) {
            sections.part1.push(i)
        } else {
            sections.part2.push(i)
        }
    }
    this.state = {
        sections: sections,
        dataSource: this.ds.cloneWithRowsAndSections(sections),
    }
}

render() {
    return (
        <ListView
            dataSource={this.state.dataSource}
            renderRow={(rowData) => <Text>{rowData}</Text>}
        />
    )
}
性能优化
为了最大限度的优化 ListView 组件的渲染性能,我们可以通过以下几种属性:
initialListSize:自定义首屏渲染行的数据量。pageSize:每次事件循环(每帧)渲染的行数。renderStaticHeader:只渲染一次的头部组件。renderStaticFoorter:只渲染一次的尾部组件。scrollRenderAheadDistance:当一行接近滚动容器范围多少像素时开始渲染该行。
另外,如果数据源很多的情况下,推荐使用 InfiniteListView 组件。
<ListView
   dataSource={this.state.dataSource}
   renderRow={(rowData) => <Text>{rowData}</Text>}
   initialListSize={10}
   pageSize={10}
   renderStaticHeader={() =>
       <Text style={{backgroundColor: 'orange', height: 50}}>header</Text>
   }
   renderStaticFoorter={() =>
       <Text style={{backgroundColor: 'orange', height: 50}}>footer</Text>
   }
   scrollRenderAheadDistance={500}
/>
下拉刷新和加载更多
这两个功能继承自 ScrollView 组件,可以查看 ScrollView 的文档来了解如何使用,这里仅仅给出一个完整的例子。
import React, { Component } from 'react';
import { View, Text } from 'react-native';
import { ListView, LoadControl, RefreshControl } from 'qunar-react-native';

class ListViewExample extends Component {
    constructor() {
        super();

        this.ds = new ListView.DataSource({
            rowHasChanged: (r1, r2) => r1 !== r2,
            sectionHeaderHasChanged: (s1, s2) => s1 !== s2
        });
        let sections = {
            part1: [],
            part2: []
        };
        for(let i = 0; i < 10; i++) {
            if(i < 10) {
                sections.part1.push(i)
            } else {
                sections.part2.push(i)
            }
        }
        this.state = {
            noMore: false,
            sections: sections,
            dataSource: this.ds.cloneWithRowsAndSections(sections),
        };
    }

    onLoad() {
        clearTimeout(this.timeId);
        this.timeId = setTimeout(() => {
            this.getMoreContent.bind(this)(5);
            this.refs.ListView.stopLoading();
        }, 1000);
    }

    onRefresh() {
        clearTimeout(this.timeId);
        this.timeId = setTimeout(() => {
            this.refs.ListView.stopRefreshing({
                result: true,
                animated: true,
            });
        }, 1000);
    }

    componentWillUnmount() {
        clearTimeout(this.timeId);
    }

    startRefreshing() {
        this.refs.ListView.startRefreshing();
    }

    startLoading() {
        this.refs.ListView.startLoading();
    }

    getMoreContent(rowsNum) {
        let sections = this.state.sections,
            len = sections.part2.length;

        if(len >= 15) {
            this.setState({
                noMore: true
            });
        } else {
            for(let i = len; i < len + rowsNum; i++) {
                sections.part2.push(sections.part1.length + i);
            }
            this.setState({
                sections: sections,
                dataSource: this.ds.cloneWithRowsAndSections(sections)
            });
        }
    }

    render() {
        const loadControl = (
            <LoadControl
                ref='LoadControl'
                height={50}
                loadComplete= {this.state.loadComplete}
                noMore={this.state.noMore}
                noticeContent='自定义提示文本'
                loadingContent='自定义加载文字'
                noMoreContent='自定义没有更多文字'
                style={{borderWidth: 2, borderColor: 'blue', height: 100}}
                textStyle={{color: 'blue'}}
                iconStyle={{color: 'blue'}}
                onLoad={this.onLoad.bind(this)}
            />
        );

        const refreshControl = (
            <RefreshControl
                ref='RefreshControl'
                height={50}
                pullStartContent='<自定义> pullStartContent'
                pullContinueContent='<自定义> pullContinueContent'
                refreshingContent='<自定义> refreshingContent'
                successContent='<自定义> successContent'
                failContent='<自定义> failContent'
                style={{backgroundColor: '#eee'}}
                textStyle={{color: 'orange'}}
                iconStyle={{color: 'orange'}}
                onRefresh={this.onRefresh.bind(this)}
            />
        );

        return (
            <View style={{flex:1}}>
                <ListView
                    ref="ListView"
                    dataSource={this.state.dataSource}
                    renderRow={(rowData) => <View style={{flex: 1, borderBottomWidth: 1, borderColor: '#ccc'}}><Text style={{ padding: 50, fontSize: 14 }}>{rowData}</Text></View>}
                    refreshControl={refreshControl}
                    loadControl={loadControl}
                />
            </View>
        )
    }
}
Section Header
通过 renderSectionHeader 属性,可以为组件每个小节(section)渲染一个粘性标题。当它刚出现时,会处在对应小节的内容顶部;继续下滑当它达到屏幕顶端的时候,会停留在屏幕顶端,一直到对应的位置被下一个小节的标题占据为止。
<ListView
    ...
    renderSectionHeader={(sectionData, sectionID) =>
        <Text style={{backgroundColor: '#fff'}}>section {sectionData} {sectionID}</Text>
    }
/>
属性
dataSource
源数据。
initialListSize
指定在组件刚挂载的时候渲染多少行数据。用这个属性来确保首屏显示合适数量的数据,而不是花费太多帧逐步显示出来。
onChangeVisibleRows
(visibleRows, changedRows) => void
当可见的行的集合变化的时候调用此回调函数。visibleRows 以 { sectionID: { rowID: true }}的格式包含了所有可见行,而changedRows 以{ sectionID: { rowID: true | false }}的格式包含了所有刚刚改变了可见性的行,其中如果值为true表示一个行变得可见,而为false表示行刚刚离开可视区域而变得不可见。
方法参数:
| 参数名 | 类型 | 描述 | 支持版本 |
|---|---|---|---|
| visibleRows | object | 当前可见行 | |
| changedRows | object | 可见状态改变的行 |
onEndReached
当所有的数据都已经渲染过,并且列表被滚动到距离最底部不足onEndReachedThreshold个像素的距离时调用。原生的滚动事件会被作为参数传递。
onEndReachedThreshold
调用onEndReached之前的临界值,单位是像素。
pageSize
每次事件循环(每帧)渲染的行数。
renderFooter
() => renderable
页头与页脚会在每次渲染过程中都重新渲染(如果提供了这些属性)。如果它们重绘的性能开销很大,可以考虑使用renderStaticHeader/renderStaticFooter。页脚会永远在列表的最底部,而页头会在最顶部。
返回值: renderable 页头组件
renderHeader
() => renderable
同renderFooter,渲染页尾组件。
返回值: renderable 页尾组件
renderStaticFooter
() => renderable
只渲染一次的头部组件。
返回值: renderable 页头组件
renderStaticHeader
() => renderable
只渲染一次的尾部组件。
返回值: renderable 页尾组件
renderRow
(rowData, sectionID, rowID, highlightRow) => renderable
从数据源(Data source)中接受一条数据,以及它和它所在section的ID。返回一个可渲染的组件来为这行数据进行渲染。默认情况下参数中的数据就是放进数据源中的数据本身,不过也可以提供一些转换器。
方法参数:
| 参数名 | 类型 | 描述 | 支持版本 |
|---|---|---|---|
| rowData | React.PropTypes.any | 数据源中的数据 | |
| sectionID | string | 所处section名 | |
| rowID | number | 所处section中的index | |
| highlightRow | function | 通过调用该函数可通知ListView高亮该行 |
返回值: renderable 每行渲染组件
renderScrollComponent
(props) => renderable
指定一个函数,在其中返回一个可以滚动的组件。ListView将会在该组件内部进行渲染。默认情况下会返回一个包含指定属性的ScrollView。
方法参数:
| 参数名 | 类型 | 描述 | 支持版本 |
|---|---|---|---|
| 可滚动组件的属性 | object |
返回值: renderable 可滚动组件
renderSeparator =={ function }==
(sectionID, rowID, adjacentRowHighlighted) => renderable
如果提供了此属性,一个可渲染的组件会被渲染在每一行下面,除了小节标题的前面的最后一行。
方法参数:
| 参数名 | 类型 | 描述 | 支持版本 |
|---|---|---|---|
| sectionID | string | 所处section名 | |
| rowID | number | 所处section中的index | |
| adjacentRowHighlighted | bool | 邻近的行是否被高亮 |
返回值: renderable 分隔组件
scrollRenderAheadDistance =={ number }==
当一个行接近屏幕范围多少像素之内的时候,就开始渲染这一行。
useOriginScrollView =={ bool }==
如果提供了此属性, 会使用原生ScrollView,配置了renderScrollComponent时不生效。
scrollEventThrottle =={ bool }==
触发onScroll最小间隔毫秒数,默认值为50。
方法
getScrollResponder
获取ScrollView,当使用原生ScrollView时(useOriginScrollView属性为true)返回滚动响应器。
返回值: scrollResponder ScrollView,当使用原生ScrollView时返回滚动响应器
startRefreshing
同ScrollView,当前组件有refreshControl属性,并且没有正在下拉刷新,则强制触发下拉刷新,变成正在刷新的状态。
stopRefreshing
同ScrollView,当前组件有refreshControl属性,并且正在下拉刷新,则停止下拉刷新的状态。
startLoading
同ScrollView,当前组件有loadControl属性,并且没有正在加载,则强制触发加载更多,变成正在加载更多的状态。
stopLoading
同ScrollView,当前组件有loadControl属性,并且正在加载,则停止加载更多的状态。
scrollToTop
返回顶部,可通过{animated: true}开启动画。可以参考这个例子。